 微语:代码适合中午敲,早晚出BUG
数值判断 JavaScript

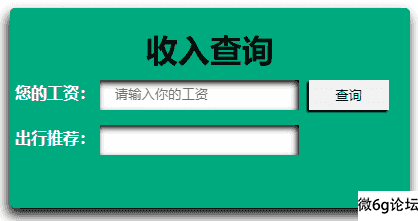
根据工资判断选择出行工具
代码
<!DOCTYPE html>
<html>
    <head>
        <meta charset="utf-8">
        <title></title>
        <style>
            * {
                margin: 0;
                padding: 0;
                box-sizing: border-box;
            }

            .box {
                margin: 20px auto;
                border-radius: 5px;
                font-size: 16px;
                font-weight: bold;
                width: 400px;
                height: 200px;
                background-color: #00aa7f;
                padding-top: 20px;
                box-shadow: -2px 7px 12px #000000;
            }

            input {
                border: 0;
                margin: 5px;
                height: 30px;
                line-height: 30px;
                padding: 0 15px;
                box-shadow: inset -2px 3px 6px #000000;
                outline: none;
            }

            p {
                color: #fff;
                margin: 5px;
            }

            button {
                box-shadow: -2px 2px 2px #000000;
                vertical-align: middle;
                height: 30px;
                border: 0;
                width: 80px;
            }

            button:hover {
                color: #55aaff;
            }

            button:active {
                box-shadow: inset -2px 2px 2px #000000;
            }
        </style>
    </head>
    <body>
        <!-- 4. 编程题:根据存款的多少决定使用什么交通工具:10万元以上,就买小汽车上班; 有5000元以上,就买摩托上班;
        如果有300元以上,就买自行车上班;如果有20元以上,
        就坐公交上班;否则,就只好步行上班。使用一个变量money保存存款数,
        对该变量进行判断以输出所用的交通工具。(考点:if多分支结构) -->
        <div class="box">
            <h1 style="text-align: center;">收入查询</h1>
            <p>您的工资:<input type="text" name="" id="s" placeholder="请输入你的工资"> <button onclick="cx()">查询</button></p>
            <p>出行推荐:<input type="text" id="j"></p>
        </div>

        <script>
            function cx() {
                //console.log("测试按钮是否关联成功!")
                let a = s.value;
                if (a == "" || isNaN(a) == true) {
                    alert("请输入您的工资")
                    s.value = null;
                } else if (a > 100000) {
                    document.getElementById("j").value = "小汽车";
                    console.log(j.value)

                } else if (a > 5000) {
                    document.getElementById("j").value = "摩托";
                    console.log(j.value)

                } else if (a > 300) {
                    document.getElementById("j").value = "自行车";
                    console.log(j.value)
                    console.log("自行车")
                } else if (a > 20) {
                    document.getElementById("j").value = "公交车";
                    console.log(j.value)

                } else {
                    document.getElementById("j").value = "走路";
                    console.log(j.value)
                }
            }
        </script>
    </body>
</html>
性别判断 JavaScript

代码
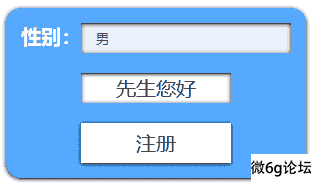
<!-- 2. 编程题:定义变量gender保存性别,再使用if语句进行判断。如果是男,
在网页中输出“先生你好”,如果是女,在网页中输出“小姐你好”。(考点:if分支语句) -->

<!DOCTYPE html>
<html>
    <head>
        <meta charset="utf-8" />
        <meta name="viewport" content="width=device-width, initial-scale=1">
        <title></title>
        <style>
            .name{
                box-shadow: 0px 1px 4px #000000;
                border-radius: 15px;
                text-align: center;
                font-size: 20px;
                width: 300px;
                margin: 20px auto;
                background-color: #55aaff;
            }
            input{
                margin-top: 15px;
                width: 210px;
                height: 30px;
                background-color: #ffffff;
                border: 0;
                box-sizing: border-box;
                padding: 0 15px;
                box-shadow: inset 0px 1px 4px #000000;
                outline-color: #ffffff;
            }
            button{
                font-size: 20px;
                width: 150px;
                height: 40px;
                border: 0;
                background-color: #ffffff;
                margin-bottom: 15px;
                box-shadow: 0px 1px 4px #000000;
                outline-color: #ffffff;
            }
            button:hover{
                box-shadow: inset 0px 1px 4px #ffffff;
            }
            button:active{
                box-shadow: inset 0px 1px 4px #000000;
            }
            span{
                text-align: center;
                margin: 0 auto;
                width: 150px;
                height: 30px;
                line-height: 30px;
                line: height;: 30px;
                background-color:#fff;
                display: block;
                box-shadow: inset 0px 1px 4px #000000;
            }
        </style>
    </head>
    <body>
        <div class="name">
             <p style="color: #fff; font-weight: bold;">性别:<input type="text" id="gender" placeholder="请输入性别" ></p>
             <p><span id="name" ></span></p>
             <p><button onclick="log()">注册</button></p>
        </div>

        <script>
             function log(){

                 //console.log("绑定按钮测试")
                 if (gender.value === "男"){
                 document.getElementById("name").innerHTML = "先生您好";
                 console.log("先生您好")

                 }
                 else if(gender.value === "女"){
                 document.getElementById("name").innerHTML = "女士您好";
                 console.log("女士您好")

                 }
                 else{
                     alert("请输入性别");
                     gender.value=""
                }

             }
            /*let man = "先生您好";
            let lady = "女士您好";
            let gender ="男"

            if (gender === "男"){
            document.write(man)
            }

            else if(gender === "女"){
             document.write(lady)
            }*/
        </script>
    </body>
</html>++i 和i++区别 JavaScript

代码
<!DOCTYPE html>
<html>
    <head>
        <meta charset="utf-8" />
        <meta name="viewport" content="width=device-width, initial-scale=1">
        <title></title>
        <style>
            * {
                box-sizing: border-box;
                margin: 0;
                padding: 0;
                font-size: 16px;
                font-weight: bold;

            }

            .box {

                color: #fff;
                border-radius: 8px;
                width: 500px;
                height: 240px;
                background-color: seagreen;
                margin: 20px auto;
                box-shadow: inset -2px 7px 22px #000000;
            }

            input {
                text-align: center;
                padding: 0 15px;
                outline-color: #55aaff;
                border: 0;
                height: 30px;
                box-shadow: 4px 4px 3px #000000;
            }

            #sum1,
            #sum2 {
                width: 150px;
            }

            p {
                margin: 20px;

            }

            #s {
                border: 0;
                padding: 0 10%;
                width: 150px;
                height: 30px;

            }

            #j {
                color: #fff;
                width: 150px;
                line-height: 30px;
            }

            button {
                width: 150px;
                height: 30px;
                border: 0;
                box-shadow: 0px 1px 4px #000000;
            }

            #xs {
                line-height: 30px;
                color: #aa0000;
                width: 150px;
                background-color: #fff;

            }
        </style>
    </head>
    <body>

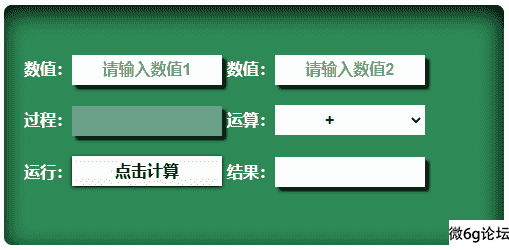
        <!-- 3. 编程题: 运算完成后计算出a b c d的值(自己写出答案后再打印运算结果,互相验证)(考点:运算符 ++ --)
               let a = 5, b = 7;
               let c = b++ - --a;
               let d = ++a + b--; -->

        <div class="box">
            <p style="padding-top: 50px; ">
                数值:<input type="text" id="sum1" placeholder="请输入数值1">
                数值:<input type="text" id="sum2" placeholder="请输入数值2">
            </p>

            <p>
                过程:<input type="text" id="j" disabled>
                运算:<select id="s">
                    <option>+</option>
                    <option>-</option>
                </select>
            </p>

            <p>
                运行:<button onclick="js()">点击计算</button>
                结果:<input type="text" id="xs" disabled>
            </p>

        </div>

        <script>
            function js() {
                let S = s.value; //定义选择框变量
                let Sum = 0; //定义存储计算结果变量
                let Sum1 = Number(sum1.value); //输入框1
                let Sum2 = Number(sum2.value); //输入框2
                if (isNaN(Sum1) == true || isNaN(Sum2) == true) { //判断参数是否为数字
                    sum1.value = null;
                    sum2.value = null;
                    document.getElementById("xs").value = "参数错误"
                }
                else if (S == "+" && Sum1 != " " && Sum2 != " ") { //判断运算符
                    Sum = ++Sum1 + Sum2--;
                    xs.value = Sum; //把运算结果赋值给显示框
                    document.getElementById("j").value = "++" + sum1.value + "   " + "+" + "   " + sum2.value + "- -";
                }
                else if (S == "-" && Sum1 != " " && Sum2 != " ") {
                    Sum = ++Sum1 - Sum2--;
                    xs.value = Sum;
                    document.getElementById("j").value =  "++" +  sum1.value + "   " + "-" + "   " + "- -"+sum2.value;

                } else {
                    sum1.value = null;
                    sum2.value = null;
                    document.getElementById("xs").value = "参数错误"

                }
            }
        </script>
    </body>
</html>
JavaScript验证value值是否是数字 JavaScript
方法1:使用js自带的全局函数isNaN()
function btn(){
    var a=document.getElementById('num1').value;
    if(isNaN(a)==true)
    {
        alert('不是数字');

    }
}
方法2:使用正则表达式
/**
* 校验只要是数字(包含正负整数,0以及正负浮点数)就返回true
**/
function isNumber(val){

//非负浮点数
var regPos = /^\d+(\.\d+)?$/;

 //负浮点数
var regNeg = /^(-(([0-9]+\.[0-9]*[1-9][0-9]*)|([0-9]*[1-9][0-9]*\.[0-9]+)|([0-9]*[1-9][0-9]*)))$/;
    if(regPos.test(val) || regNeg.test(val)){
        return true;
    }else{
        return false;
    }

}
2.1校验正负正数就返回true
/**
* 校验正负正数就返回true
**/
function isIntNum(val){
    var regPos = / ^\d+$/; // 非负整数
    var regNeg = /^\-[1-9][0-9]*$/; // 负整数
    if(regPos.test(val) || regNeg.test(val)){
        return true;
    }else{
        return false;
    }
}商品结算 JavaScript
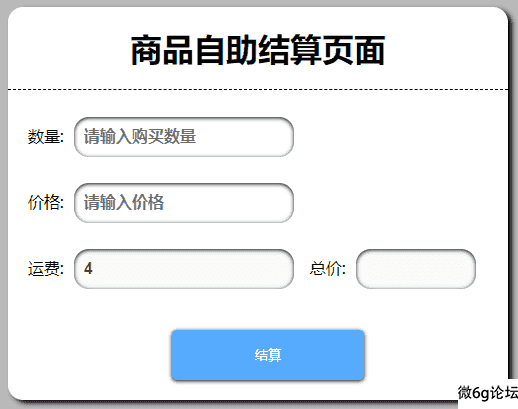
效果图

代码
<!DOCTYPE html>
<html>
<head>
<meta charset="utf-8">
<title></title>
<style>
body {
background-color: #b9b9b9;
}
h1 {
padding: 20px 0;
text-align: center;
border-bottom: 1px dashed;
}
.sp {
box-sizing: border-box;
margin: 0 auto;
width: 500px;
background-color: #fff;
border-radius: 15px;
box-shadow: 4px 3px 5px #000000;
}
input {
font-size: 16px;
font-weight: bold;
padding: 0 10px;
margin: 5px 0;
margin-left: 10px;
width: 200px;
height: 40px;
border: 0;
box-shadow: inset 0px 1px 4px #000000;
outline-color: #ffffff;
border-radius: 15px;
}
p {
margin-left: 20px;
b
}
#sum {
color: #aa0000;
width: 100px;
}
.sp #button {
text-align: center;
}
button {
border-radius: 5px;
width: 40%;
height: 50px;
border: 0;
background-color: #55aaff;
color: #fff;
box-shadow: 0px 1px 4px #000000;
margin: 20px 0;
}
button:hover {
box-shadow: inset 0px 1px 4px #000000;
}
#freight {
outline: none;
}
</style>
</head>
<body>
<!-- 8. 场景题: 小明在网上购物,买了3个笔记本,每个5.78元,商家不包邮,还需要付4元运费,
但他有一张满10元减2元的优惠券,编程计算出最终小明要支付的金额。请使用变量存储数据,
变量 num保存数量,price保存价格,freight保存运费,coupon保存优惠券(考点:编程思维、变量使用、运算符) -->
<div class="sp">
<h1>商品自助结算页面</h1>
<p>数量:<input type="text" id="num" placeholder="请输入购买数量"></p>
<p>价格:<input type="text" id="price" placeholder="请输入价格"></p>
<p>运费:<input type="text" id="freight" value="4" disabled> 总价:<input type="text" id="sum" disabled></p>
<p id="button"> <button id="jes">结算</button></p>
</div>
<script type="text/javascript">
jes.onclick = function() {
let num = Number(document.getElementById("num").value); //数量
let price = Number(document.getElementById("price").value); //价格
let freight = Number(document.getElementById("freight").value); //运费
let sum = num * price + freight; //根据获取的对应值,计算总价赋值给sum
if (num == '') { //判断是否输入购买数量
alert('请输入购买数量'); //没有输入就弹窗提示
} else if (price == '') { //判断是否输入购买价格
alert('请输入价格'); //没有输入就弹窗提示
} else if (sum >=10) { //满足以上2个条件执行第三个,判断总价是否满足使用优惠券条件
sum = sum - 2;
alert('恭喜你已经使用满10元-2元优惠券');
document.getElementById("sum").value = sum;
} else {
document.getElementById("sum").value = sum; //满足前2个,不满足第三个,则执行否则[else],然后退出程序return 0
return 0; //退出程序
}
}
// 作业
let num = 3; //数量
let price = 5.78; //价格
let freight = 4; //运费
let coupon = 10; //优惠券
let sum = num * price + freight; //计算笔记本总价格
if (sum > coupon) { //判断笔记本总价格是否满足优惠券使用,满足-2。
sum = sum - 2;
}
console.log('数量:',num,'单价:',price,'运费:',freight,'总价格:', sum); //输出最终价格
let a=10;
let b=5;
let c="5";
console.log(a==b);
console.log(b==c);
console.log(b===c);
console.log(b!==c);
console.log(a!=b);
</script>
</body>
</html>
JavaSrcipt的引入四种方式 JavaScript
1.外链式
<script type="text/javascript" src="js/main.js"></script>2.协议方式
<a href="javascript:alert('我是协议方式!')">点击</a>3.内嵌式
    <script>
            alert("我是内嵌式");
   </script>
4.行内式
<button onclick="alert('我是行内式')">按钮</button>闲来无事写了个工具栏 前端
效果图

预留了顶部位置准备加图标的,有需要的可以研究,也可以自己改进。
CSS
    /* 小菜单 */
            .nav-fl{
                font-size: 14px;
                width: 726px;
                height: 100px;
                background-color: #ffffff;
                margin: 0 auto;
            }
            /* 菜单下的列表 */
            .nav-fl li{
                width: 120px;
                height: 100px;
                border-right: 1px dashed;
                text-align: center;
                position: relative;
                float: left;
                overflow: hidden;

            }
            /* 菜单下面按钮样式 */
            .nav-fl button{
                width: 60%;
                height:30px;
                border: 0;
                color: #fff;
                background-color: #55aaff;
                margin-top:12px;
                cursor: pointer;
            }
            .nav-fl span:nth-child(1){
                margin-top:40px;
                padding: 5px 0;
                width: 110px;
                display: inline-block;
            }
            /* 菜单下面的列 */
            .nav-fl .cs{
                width: 120px;
                height: 100px;
                background-color:#fff;
                position: absolute;
                transition: all 0.2s;

            }
            .nav-fl li:last-child{
                border-right:0;
            }
            li:hover .cs{
                /* 像上移动 */
                margin-top:-40px;
            }
HTML
<div class="nav-fl">
            <ul>
                <li>
                    <div class="cs">
                        <span>相册图库</span>
                        <span>图片相册介绍</span>
                        <a href="#"><button>点击进入</button></a>
                    </div>
                </li>

                <li>
                    <div class="cs">
                        <span>相册图库</span>
                        <span>图片相册介绍</span>
                        <a href="#"><button>点击进入</button></a>

                    </div>
                </li>

                <li>
                    <div class="cs">
                        <span>相册图库</span>
                        <span>图片相册介绍</span>
                        <a href="#"><button>点击进入</button></a>

                    </div>
                </li>

                <li>
                    <div class="cs">
                        <span>相册图库</span>
                        <span>图片相册介绍</span>
                        <a href="#"><button>点击进入</button></a>

                    </div>
                </li>

                <li>
                    <div class="cs">
                        <span>相册图库</span>
                        <span>图片相册介绍</span>
                        <a href="#"><button>点击进入</button></a>

                    </div>
                </li>

                <li>
                    <div class="cs">
                        <span>相册图库</span>
                        <span>图片相册介绍</span>
                        <a href="#"><button>点击进入</button></a>

                    </div>
                </li>
            </ul>
        </div>


