 微语:代码适合中午敲,早晚出BUG
WebSocket使用方法 前端
1.创建WS对象,与服务器建立webscoket链接
let ws: WebSocket
ws = new WebSocket('ws接口地址')
2.监听ws对象是否建立链接成功
ws.onopen = () => {
    //只要成功,就会触发此回调
}
3.主动推送一个消息给服务器
ws.send( "内容" )4.监听服务器推送的消息
ws.onmessage = (e) => {
 console.log(e);
}
5.前端主动断开链接
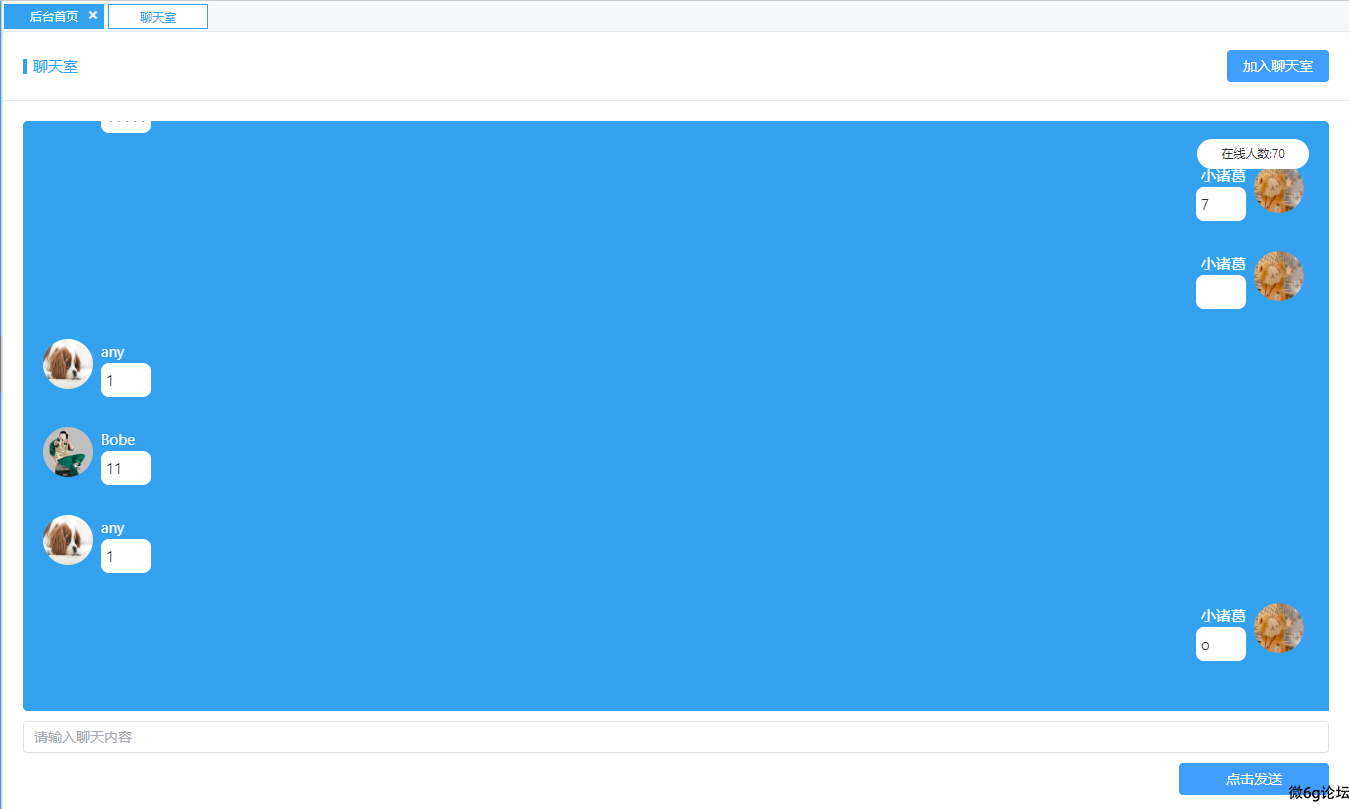
ws.close()基于Vue3,webscoket聊天室 Vue

<template>
    <MyCart title="聊天室">
        <template #button>
            <el-button @click="chat" type="primary">加入聊天室</el-button>
        </template>
        <template #default>
            <div class="info" ref="scrollContainer">
                <div class="people"><span>在线人数:{{ number }}</span> </div>
                <div :class="{ 'left': item.state === 0, 'right': item.state === 1 }" v-for="(item, index) in datainfo"
                    :key="index">
                    <div class="img">
                        <img :src="item.head" alt="头像">
                    </div>
                    <div class="title">
                        <div class="Usertitle"> <span>{{ item.userName }}</span></div>
                        <div class="text">
                            <p>{{ item.data }}</p>
                        </div>
                    </div>
                </div>
            </div>
            <div class="info-foot">
                <el-input v-model="input" placeholder="请输入聊天内容" @keyup.enter="handleEnter" />
                <div class="send"> <el-button @click="sends" type="primary">点击发送</el-button></div>
            </div>
        </template>
    </MyCart>
</template>

<script lang="ts" setup>
import { ref, watch } from 'vue';
import MyCart from '../components/MyCard.vue'
let input = ref('')
let datainfo = ref<Array<msg>>([])
let number = ref()//总人数
let img = "https://t9.baidu.com/it/u=954632137,1492850490&fm=218&app=126&size=f242,150&n=0&f=JPEG&fmt=auto?s=9628FE054373C7CE5406AD6D0300506B&sec=1691600400&t=75097cd4d59b3feec556752f3da3b042"
const scrollContainer = ref(null);
interface msg {
    data: string//消息内容
    head: string//头像
    type?: string//是消息
    userName: string//用户名
    state: number//状态
}

// 1.与服务器建立连接
let ws: WebSocket
let chat = () => {
    console.log('加入聊天室')
    ws = new WebSocket('ws://129.211.169.131:10009/globalchat')
    // 3.监听服务器推送事件
    ws.onopen = () => {
        console.log('与服务器建立成功');
        ws.send(JSON.stringify({
            type: 'name',
            data: "小诸葛",
            head: "https://t9.baidu.com/it/u=954632137,1492850490&fm=218&app=126&size=f242,150&n=0&f=JPEG&fmt=auto?s=9628FE054373C7CE5406AD6D0300506B&sec=1691600400&t=75097cd4d59b3feec556752f3da3b042"        //string:头像url
        }))
    }
    // 监听服务器推送事件
    ws.onmessage = (e) => {
        let data = JSON.parse(e.data)
        console.log(data);
        if (typeof data.data == 'number') {
            number.value = data.data
        }
        if (data.type === 'message') {
            if (data.userName === '小诸葛') {
                data.state = 1
            }
            else {
                data.state = 0
            }
            datainfo.value.push(data)
        }
        console.log(datainfo, '123');
        // ElNotification({
        //     title: '通知',
        //     message: data.data,
        // })
    }

}

let msg = () => {
    ws.send(JSON.stringify({
        type: 'message',   //string: 固定message
        data: input.value
    }));
    input.value = ''
}
let sends = () => {
    msg()
}
// 回车
const handleEnter = () => {
    msg()
}
watch(datainfo.value, () => {
    if (scrollContainer.value) {
        setTimeout(() => {
            const container = scrollContainer.value as unknown as HTMLElement;
            if (container) {
                container.scrollTop = container.scrollHeight;
            }
        }, 0);
    }
});
 //处理破图

</script>

<style lang="scss" scoped>
.info-foot {
    margin-top: 10px;
}

.info {
    width: 100%;
    height: 590px;
    background-color: #35a2ef;
    padding: 20px;
    overflow-y: scroll;
    scroll-behavior: smooth;
    /* 添加平滑滚动效果 */
    border-radius: 5px;

}

.el-card__body {
    position: relative;
}

.people {
    position: absolute;
    right: 41px;
    top: 108px;
    min-width: 112px;
    height: 30px;
    border-radius: 15px;
    background-color: #fff;
    font-size: 12px;
    display: flex;
    align-items: center;
    padding: 0 12px;
    justify-content: center;
}

.send {
    text-align: right;
    margin-top: 10px;

    button {
        width: 150px;
    }
}

.left,
.right {
    width: auto;
    display: flex;
    margin-bottom: 30px;

    .img {
        border-radius: 50%;
        overflow: hidden;
        width: 50px;
        height: 50px;
    }

    img {
        width: 50px;
        height: 50px;
    }

    .title {
        display: flex;
        flex-direction: column;
        justify-content: center;
        margin: 0 8px;
        max-width: 40%;
    }

    .Usertitle {
        color: #fff;
    }

    .text {
        background-color: #fff;
        padding: 5px;
        border-radius: 8px;
        min-height: 34px;
        min-width: 50px;

        p {
            word-break: break-all;
        }
    }
}

.right {
    flex-direction: row-reverse;

    .Usertitle {
        text-align: right;
    }
}

/* 设置滚动条轨道 */
::-webkit-scrollbar {
    width: 5px;
    /* 设置滚动条宽度 */
}

/* 设置滚动条滑块 */
::-webkit-scrollbar-thumb {
    background-color: #35a2ef;

}
</style>bug记录P标签的内容为字母的时候不会进行自动换行需要设置word-break: break-all; 前端
今天在写项目的时候发现p标签的内容为字母的时候不会进行自动换行,会把宽度撑开。
解决办法:
给p标签设置 word-break: break-all; 属性即可
饿了么Plus组件+TS+Vue3如何使用表单重置 Vue
el-dialog组件关闭的时候清空表单内容,点击按钮也一样,改成点击事件就行了
1.引入FormInstance
import type { FormInstance } from 'element-plus'
const formRef = ref<FormInstance>()
2.定义一个空的ref挂载到el-dialog上面
let elm=ref(null)3.绑定ref,此处的v-model用于控制是否显示弹窗 ,@closed是关闭弹窗的事件方法。
<el-dialog v-model="OrderQuery"  @closed="sta(formRef)" ref="elm">

</el-dialog>
4.model为表单对象,这里也要使用ref,其中的formRef是引入进来的包创建的,在el-form-item组件上绑定prop,值为你的表单内容。
<el-form :model="numberValidateForm" label-position="top"  ref="formRef">
     <el-form-item label="订单号" :label-width="formLabelWidth" prop="name">
       <el-input v-model="numberValidateForm.name" autocomplete="off"  placeholder="请输入订单编号" />
    </el-form-item>
</el-form>
5.触发关闭窗口回调
let sta = (formEl: FormInstance | undefined) => {
  if (!formEl) return
  formEl.resetFields()
}
完整代码:去掉了多余的,留下了最重要的,方便观察
<el-form :model="numberValidateForm"  ref="formRef">
     <el-form-item  prop="name">
       <el-input v-model="numberValidateForm.name"/>
    </el-form-item>
</el-form>

<script lang="ts" setup>
//引入包
import type { FormInstance } from 'element-plus'

const formRef = ref<FormInstance>()

const numberValidateForm = ref({
  name: '',
})

//关闭回调
const resetForm = (formEl: FormInstance | undefined) => {
  if (!formEl) return
  formEl.resetFields()
}
</script>Element-Plus分页组件默认是英文如何改成中文 Vue
原图

修改之后:

解决办法:
在main.js中加入如下代码:
import zhLocale from "element-plus/es/locale/lang/zh-cn";
app.use(ElementPlus, { locale: zhLocale })Vue3组件的二次封装以及插槽、传值的使用 Vue
使用ElementUI的Card的组件的时候,很多地方都会用到卡片这个组件,以及修改一下他默认的样式,进行了二次的封装。
效果图如下:

这里封装主要是针对表格处理的,接收了一个标题参数,和2个具名插槽,一个是是否导出表格按钮,一个是表格内容。
子组件代码如下:
<template>
    <el-card class="box-card">
        <template #header>
            <div class="card-header">
                <span class="title">{{ props.title }}</span>
                <slot name="button"></slot>
            </div>
        </template>
        <slot name="table"></slot>
    </el-card>
</template>

<script lang="ts" setup>
let props = defineProps({
    title: {
        type: String,
        default: '这是标题'
    },
})
</script>

<style lang="scss" scoped>
.card-header {
    display: flex;
    justify-content: space-between;
    align-items: center;
}

.text {
    font-size: 14px;
}

.item {
    margin-bottom: 18px;
}

.box-card {
    width: 100%;
}

:deep(.el-table .cell) {
    text-align: center;
}

.card-header .title {
    position: relative;
    color: #35a2ef;
    padding-left: 10px;
}

.card-header .title::after {
    content: "";
    display: block;
    width: 4px;
    height: 15px;
    background-color: #35a2ef;
    position: absolute;
    left: 0px;
    top: 5px;
}
</style>
父组件代码如下:
<template>
    <MyCart title="账号管理">
        <template #button>
            <el-button type="primary" @click="Table">
                导出表格<el-icon class="el-icon--right">
                    <Download />
                </el-icon>
            </el-button>
        </template>

        <template #table>
            <!-- v-slot:table -->
            <el-table :data="userList" border style="width: 100%">
                <el-table-column type="selection" prop="date" fixed />
                <el-table-column prop="id" label="ID" />
                <el-table-column prop="account" label="账号" />
                <el-table-column prop="userGroup" label="用户组" />
                <el-table-column prop="ctime" label="创建时间">
                    <template #default="props">
                        <span>{{ props.row.ctime }}</span>
                    </template>
                </el-table-column>
                <el-table-column label="操作" width="120" fixed="right">
                    <template #default>
                        <el-button link type="primary" size="small">编辑</el-button>
                        <el-button link type="primary" size="small">删除</el-button>
                    </template>
                </el-table-column>
            </el-table>
        </template>
    </MyCart>
</template>

<script lang="ts" setup>
import MyCart from '../../components/MyCard.vue'
import * as XLSX from 'xlsx'//表格导入导出插件
import { ref, computed, reactive } from 'vue';
import { $_UsersList } from '../../apis/user'
interface user {
    "id": number,//账号ID
    "ctime": string,//用户名称
    "account": string,//注册时间
    "userGroup": string,//管理权限
    "imgUrl": string//头像地址
}

let userList = ref<Array<user>>([])
$_UsersList({
    currentPage: 1,
    pageSize: 10
}).then(res => {
    // 处理时间
    res.data.data.map((v: user) => {
        v.ctime = new Date(v.ctime).toLocaleString()
    });
    userList.value = res.data.data
})

let Table = () => {
    //1. 创建一个工作簿
    const workBook = XLSX.utils.book_new()
    // 2. 创建工作表 worksheet
    const workSheet = XLSX.utils.json_to_sheet(userList.value)
    // 3. 将工作表放入工作簿中
    XLSX.utils.book_append_sheet(workBook, workSheet)
    XLSX.writeFile(workBook, `账号列表.xlsx`, {
        bookType: 'xlsx'
    })
}
</script>

<style lang="scss" scoped></style>
总结:
1.父传子使用的时候defineProps,在Vue3里面在setup下不需要引入就可以使用
例如:子组件接收参数
let props = defineProps({
    title: {
        type: String,
        default: '这是标题'
    },
})
父组件传递只需要这样:
<MyCart title="传递的内容"> </MyCart>2.具名插槽:如果需要插入内容的时候,并且想指定到某个位置需要给插槽定义名字。
例如:在组件通过name定义一个插槽名字为button,这个插槽放到上面位置,传过来的东西就会显示在什么地方,
<slot name="button"></slot>父组件如下:在vue3里面需要使用template进行包裹 后面跟#定义的名字就可以,或者 v-slot:button 也可以
 <template #button>
    这里面是内容
 </template>

  <template v-slot:button>
    这里面是内容
 </template>


