 微语:代码适合中午敲,早晚出BUG
Vue中API接口如何二次封装Axios进行高效开发 Vue
1.src目录下新建 utlis文件夹 ->axios.ts
引入axios插件,创建公共服务器IP ,设置请求拦截器和相应拦截器,最后暴露出去
import axios from "axios"
export const SERVER_IP = 'http://XXXXXX/'

export const request = axios.create({
    baseURL: SERVER_IP,
    timeout: 6000,
})
//请求拦截器
request.interceptors.request.use()
//相应拦截器
request.interceptors.response.use()
2.src目录下创建 apis文件夹->里面存储分类接口例如用户接口,登录接口:login.ts
引入封装的axios,进行接口的一个封装,然后暴露出去
import { SERVER_IP, request } from '../utlis/axios'
import type { Login } from './interface'

// 登录接口
export const $_checkLogin = (data: Login) => {
    return request({
        url: '/users/checkLogin',
        method: 'POST',
        data
    })
}
//获取列表
export const $_UsersList = (params: userList) => {
    return request({
        url: '/users/list',
        method: 'GET',
        params
    })
}
3.在需要使用接口的页面只需调用封装的api也就是apis文件夹里面的文件例如:login.ts
<script lang="ts" setup>
import { reactive } from 'vue';
import { $_checkLogin } from '../apis/login'
let form = reactive({
    account: '',
    password: ''
});
let onSubmit = () => {
    $_checkLogin(form).then(res => {
     //请求成功之后操作
    })
}
</script>
封装的好处方便我们后期维护管理API,如果吧api直接在写每个页面进行直接发请求,文件多起来了,就变的难以维护,如果用到了相同的请求也会造成代码冗余度过高。
封装之后对接口统一进行管理,更方便直观的查看API和维护,也降低了代码冗余度,和可读性。
以上示例都是基于Vue3+Ts写的,用Vue2+JS封装流程也是一样,只是不需要reactive这种响应式
vue3如何使用动态class切换 Vue
这里写的是一个旋转按钮使用的是elementPlus
vue3动态class三目预算:class="isRotated ? 'rotate' : 'reverseRotate'"通过点击事件给变量取反来实现class样切换
HTML
 <div class="numE" @click="numE">
    <el-icon ref="numElement" color="#fff" size="30px" :class="isRotated ? 'rotate' : 'reverseRotate'">
     <Expand />
    </el-icon>
 </div>
CSS
.rotate,
.reverseRotate {
    transition: transform 0.5s ease;
}
.rotate {
    transform: rotate(180deg);
}
.reverseRotate {
    transform: rotate(0deg);
}
JS
import { ref } from 'vue'
let isRotated = ref(false)
let numE = () => {
    isRotated.value = !isRotated.value;
}vue3的动态css v-bind() Vue
vue3支持 css中支持v-bind来绑定动态样式值,例如:
<template>
    <span>123</span>
</template>
<script setup>
let color="#fff"
</script><style lang="scss" scoped>
span {
background-color: black;
color: v-bind(color);
}
</style>Vue3的生命周期有哪些? Vue
DOM节点挂载前
onBeforeMount(() => {
  console.log('DOM节点挂载前');
})
DOM节点挂载后
onMounted(() => {
  console.log('DOM节点挂载后');
})
更新前
onBeforeUpdate(() => {
  console.log('更新前');
})
更新后
onUpdated(() => {
  console.log('更新后');
})
卸载前
onBeforeUnmount(() => {
  console.log('卸载前');
})
卸载完成后
onUnmounted(() => {
  console.log('卸载完成后');
})点击元素让其滚动到锚点定位scrollIntoView方法 Vue
示例:

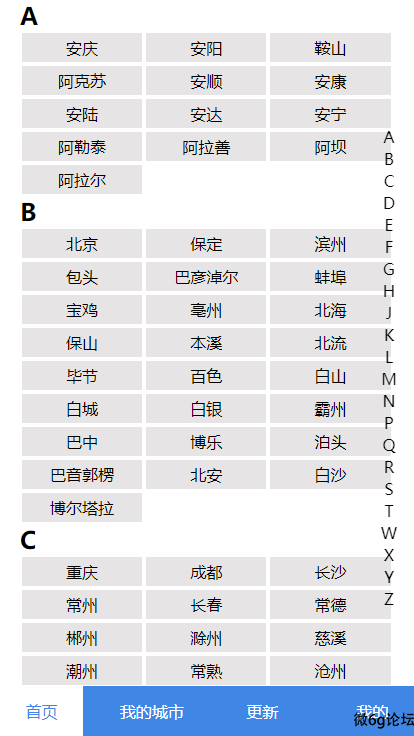
点击右侧的字母,滚动到具体的位置,先给右侧的标题绑定点击事件,拿到点击的元素,在通过scrollIntoView方法进行滚动
{ behavior: "smooth" }是平滑滚动属性
    <div class="aside">
        <ul>
            <li @click="clickAZ(item)" v-for="(index, item) in abclist.list" :key="item">{{ item }}</li>
        </ul>
    </div>
    <div class="bscroll">
        <ul class="index">
            <li v-for="(index, item) in abclist.list" :key="item">
                <h2 :id="item">{{ item }}</h2>
                <div class="span">
                    <span :class="{ 'active': datalist.cityname == item }" @click="span(item)" v-for="(item, v) in index"
                        :key="v">
                        {{ item }}</span>
                </div>
            </li>
        </ul>
    </div>
JS
let clickAZ = (key) => {
    console.log(key);
    let element = document.getElementById(key);
    element.scrollIntoView({ behavior: "smooth" });
}
CSS
body,html{
    height: 100%;
}
.bscroll {
    height: 100%;
    overflow: scroll;
}
.index{
    height: 100%;
}Vue3如何使用vue-router进行跳转 Vue
1.首先配置路径信息,已经单独写过一篇了 点击前往
2.引入包文件
import { useRouter } from 'vue-router'3.定义变量接一下useRouter实例
let router = useRouter()4.使用router.push() 进行跳转()里面为path地址
router.push('/index')Vue3配置路由信息过程VueRouter Vue
1.引入包文件
import { createRouter, createWebHashHistory } from 'vue-router';2.引入组件地址,也可以使用懒加载引入
import Home from '../views/Home.vue';//引入模式3.配置路由数组
const routes = [
    { path: '/', component: Home },
    { path: '/info', component: () => import('../views/Info.vue') },
];
4.创建路对象
const router = createRouter({
    history: createWebHashHistory(),
    routes,
});
5.暴露出去
export default router6.在main.js中引入使用
const app = createApp(App) // 创建Vue应用程序实例,并传入根组件App
app.use(router)
app.mount('#app') // 将应用程序挂载到页面上的#app元素
7.App.vue中放置出口
<router-view />完整示例:
ruoter.js
// 配置路由文件
import { createRouter, createWebHashHistory } from 'vue-router';
import Home from '../views/Home.vue';
// 配置路由数组
const routes = [
    { path: '/', component: Home },
    { path: '/info', component: () => import('../views/Info.vue') },
];
// 创建路由对象
const router = createRouter({
    history: createWebHashHistory(),
    routes,
});
// 暴露对象
export default router
main.js
import { createApp } from 'vue'
import App from './App.vue'
import router from './router/router'
const app = createApp(App) // 创建Vue应用程序实例,并传入根组件App
app.use(router)
app.mount('#app') // 将应用程序挂载到页面上的#app元素
App.vue
<template>
  <router-view />
</template>
Vue3组件如何进行值的传递 Vue
子传父:子组件用defineEmits传递
//子组件
<template>
    <div>
        <button @click="btn">我的按钮</button>
    </div>
</template>

<script setup>
import { ref } from "vue"

let sex = ref(2000)
let $emit = defineEmits(['sex'])
let btn = () => {
    $emit('sex', sex.value)
}
</script>
//父组件
<template>
<div>
<MyButton @sex="fys" />
</div>
</template>
<script setup>
let fys = (val) => {
console.log(val);
}
</script>父传子: 使用defineProps来接收
//父组件
<template>
    <MyButton :msg="access" />
</template>

<script setup>
let access = '今天天气不错'
</script>
//子组件
<template>
<div>
<button>我的按钮</button>
{{ props.msg }}
</div>
</template>
<script setup>
const props = defineProps({
msg: {
type: String,//参数类型
required: true,//是否必传
default: '天气状态' //默认值
}
});
</script>简化版传递
父传子 世界使用defineProps(['参数名1'],[‘参数名2’])方式来接收
//父组件
<template>
  <div>
    <MyButton sex="2000" />
  </div>
</template>
//子组件
<template>
<div>
<button>我的按钮</button>
</div>
</template>
<script setup>
let props = defineProps(['sex'])
console.log(props.sex);
</script>子传父 使用$emit在标签上面直接传递参数 @click="$emit('msg', aa)" msg为事件名,aa为参数
//子组件
<template>
    <div>
        <button @click="$emit('msg', aa)">我的按钮</button>

    </div>
</template>

<script setup>
let aa = '天气不错'
</script>
//父组件
<template>
<MyButton @msg="as" />
</template>
<script setup>
let as = (val) => {
console.log(val);
}
</script>


