 微语:代码适合中午敲,早晚出BUG
vue 解决路径多次点击报错 Vue
在路由中如下配置即可解决
const originalPush = VueRouter.prototype.push;
VueRouter.prototype.push = function push(location) {
  return originalPush.call(this, location).catch(err => err)
}登录模板 Vue
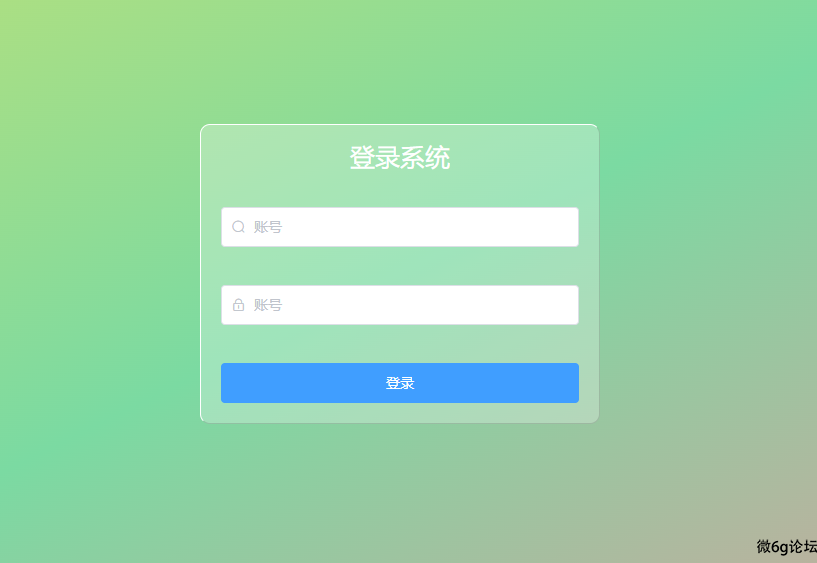
基于vue的登录模板

<template>
    <div class="login">
        <div class="login_box">
            <h1> 登录系统</h1>
            <el-input prefix-icon="el-icon-search" v-model="form.username"
                :class="{ username: username, usernames: usernames }" @focus="uname" @blur="unames"></el-input>
            <el-input prefix-icon="el-icon-lock " v-model="form.password"
                :class="{ username: password, usernames: passwords }" show-password @focus="pad" @blur="pads"></el-input>
            <el-button type="primary" @click="submits">登录</el-button>
        </div>
    </div>
</template>

<script>
export default {
    data() {
        return {
            form: {
                username: '',
                password: '',
            },
            username: true,
            usernames: false,
            password: true,
            passwords: false,
        }
    },
    methods: {
        // 登录事件
        submits() {
            this.$router.push('/index')
        },
        // 获取焦点
        //账号
        uname() {
            this.username = false;
            this.usernames = true;
        },
        // 密码
        pad() {
            this.password = false;
            this.passwords = true;
        },
        // 失去焦点
        // 账号
        unames() {
            this.username = true;
            this.usernames = false;
            if (this.form.username !== "") {
                this.username = false;
            }
        },
        // 失去焦点
        // 密码
        pads() {
            this.password = true;
            this.passwords = false;
            if (this.form.password !== "") {
                this.password = false;
            }
        },
    }
}
</script>

<style lang="less" scoped>
.login::after {
    content: '';
    /* 必须的属性 */
    position: absolute;
    top: 0;
    left: 0;
    right: 0;
    bottom: 0;
    background-image: linear-gradient(to bottom right, #dbe464, rgb(123, 218, 162), #f18e9b);
    background-size: cover;
    z-index: -1;
}

.login {
    position: relative;
    width: 100%;
    height: 100vh;
    display: flex;
    align-items: center;
    justify-content: center;

    .username::after,
    .usernames::after,
    .password::after,
    .passwords::after {
        content: "账号";
        color: #c0c4cc;
        display: block;
        top: 13px;
        left: 33px;
        position: absolute;
        font-size: 14px;
        transition: all 0.5s;
        // 鼠标点击穿透
        pointer-events: none;
    }

    .usernames::after,
    .password::after,
    .passwords::after {
        content: "账号";
        top: -7px;
        color: #409eff;
    }

    input {
        position: relative;

    }

    input::after {
        content: '';
        position: absolute;
        top: 0;
        left: 0;
        right: 0;
        bottom: 0;
        filter: blur(10px);
        z-index: -1;
    }

    .password::after {
        content: "密码";
    }

    .passwords::after {
        content: "密码";
    }

    .login_box {
        position: relative;
        width: 400px;
        height: 300px;
        display: flex;
        align-items: center;
        justify-content: center;
        flex-wrap: wrap;
        padding: 0 20px;
        border-radius: 10px;
        border: 1px solid rgb(255, 255, 255, 0.5);
        border-right: 1px solid rgba(63, 62, 62, 0.2);
        border-bottom: 1px solid rgba(63, 62, 62, 0.2);

        background-color: #ffffff45;

        h1 {
            position: relative;
            color: #ffffff;
            font-size: 25px;
        }

        .el-button {
            width: 100%;
        }
    }

    /* 小于等于手机屏幕尺寸 400px 时样式 */
    @media screen and (max-width: 500px) {

        /* 添加您想要的样式 */
        .login_box {
            height: 280px;
            width: 85%;
        }

    }
}
</style>vue中设置网页标题 Vue
1.在项目根目录中的 vue.config.js 文件中设置 title 字段,代码如下:
// vue.config.js
module.exports = {
  pages: {
    index: {
      entry: 'src/main.js',
      title: 'My App' //在这里修改应用程序的标题
    }
  }
}
在上面的示例代码中,我们将 title 字段设置为 "My App"。此时,如果您在浏览器中打开应用程序,将会看到浏览器标签页中显示的标题是 "My App"。
如果您希望在不同页面中显示不同的标题,可以使用 vue-router 提供的 meta 属性。例如:
// router.js
import Vue from 'vue'
import Router from 'vue-router'
import Home from './views/Home.vue'

Vue.use(Router)

const router = new Router({
  routes: [
    {
      path: '/',
      name: 'home',
      component: Home,
      meta: {
        title: '首页' // 修改页面标题
      }
    },
    //...其他路由省略
  ]
})

router.beforeEach((to, from, next) => {
  // 设置页面标题
  if (to.meta.title) {
    document.title = to.meta.title
  } else {
    document.title = 'My App' // 默认标题
  }
  next()
})

export default router
在上述代码中,我们在路由配置中添加了 meta 属性,并在 beforeEach 钩子函数中设置了页面的标题,这样就可以为不同的页面设置不同的标题了。
需要注意的是,由于在浏览器中,document.title 是全局变量,因此最好在每次切换路由时都设置一次标题,以确保应用程序的标题在每个页面上都正确显示。
自定义颜色主题 前端
可以用来自定义主题的颜色的修改,
代码如下:
<!DOCTYPE html>
<html lang="en">

<head>
    <meta charset="UTF-8">
    <meta http-equiv="X-UA-Compatible" content="IE=edge">
    <meta name="viewport" content="width=device-width, initial-scale=1.0">
    <title>Document</title>
    <style>
        .ha {
            background-color: #666;
        }
    </style>
</head>

<body>
    <h1 class="ha">自定义颜色</h1>
    <input type="color">

</body>
<script>

    const inputNode = document.querySelector("input");
    const btnNode = document.querySelector("button");
    const h1Node = document.querySelector("h1");

    add()

    let arr1 = "";

    inputNode.addEventListener("click", function () {
        function colorRGB2Hex(color) {
            var rgb = color.split(',');
            var r = parseInt(rgb[0].split('(')[1]);
            var g = parseInt(rgb[1]);
            var b = parseInt(rgb[2].split(')')[0]);
            var hex = "#" + ((1 << 24) + (r << 16) + (g << 8) + b).toString(16).slice(1);
            return hex;
        }

        window.setInterval(function () {
            h1Node.style.backgroundColor = inputNode.value;
            arr1 = h1Node.style.backgroundColor
            localStorage.setItem("color", colorRGB2Hex(arr1));
            console.log(colorRGB2Hex(arr1));
        }, 1000)
    })

    arr1 = JSON.stringify(arr1);
    function add() {
        inputNode.value = localStorage.getItem("color")
        console.log("此时颜色", inputNode.value);
        h1Node.style.backgroundColor = inputNode.value
    }

</script>

</html>Vue 环境安装 Vue
1.安装Vue yarn global add @vue/cli
2.创建项目 vue create 名称
3.进入项目目录/启动项目 yarn serve 或npm run serve
问题:安装之后提示“不是内部或外部命令”
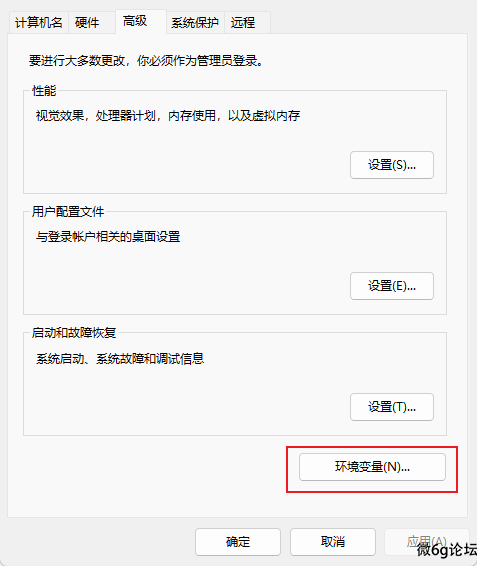
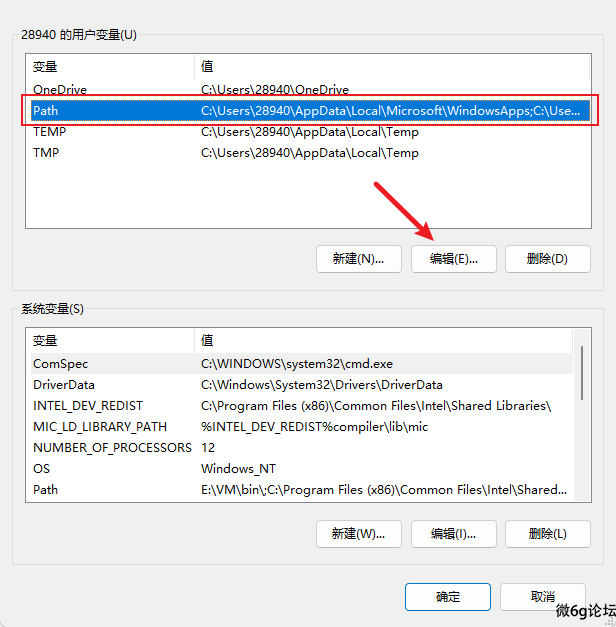
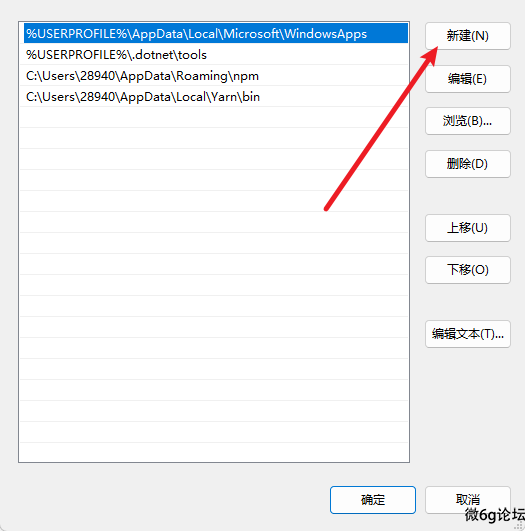
解决:命令行输入 yarn global bin 然后把得到的地址添加到环境变量中


文字超出多少行显示省略... 前端
文本超出多行的时候就显示省略,运用场景很高,记录一下
    width: 200px;
    word-break: break-all;
    text-overflow: ellipsis;
    display: -webkit-box;
    -webkit-box-orient: vertical;
    -webkit-line-clamp: 2;
    /* 这里是超出几行省略 */
overflow: hidden;去掉点击div的蓝色背景 前端
做项目的时候发现点击div后有个蓝色的背景,不喜欢,找了很多办法,最后发现了有用的,记录一下。
div:focus{
    outline: none;
}
清除a标签点击时的高亮
a {
    -webkit-tap-highlight-color: rgba(255, 255, 255, 0);
    -webkit-user-select: none;
    -moz-user-focus: none;
    -moz-user-select: none;
}
a标签中包含图片,即点击图片触发超链接时,去掉触发touchstart出现的灰色背景
a,a:hover,a:active,a:visited,a:link,a:focus{
    -webkit-tap-highlight-color:rgba(0,0,0,0);
    -webkit-tap-highlight-color: transparent;
    outline:none;
    background: none;
    text-decoration: none;
}
去掉ios图片被选中的蓝色背景
img {
    -webkit-tap-highlight-color:rgba(0,0,0,0);
    -webkit-tap-highlight-color: rgba(255, 255, 255, 0);
    -webkit-user-select: none;
    -moz-user-focus: none;
    -moz-user-select: none;
    user-select: none;
}


